Why Zip Files
In case you are used to compressing files, you may already know the advantages of zipping files and folders.
- Zipping files compresses them so they take up less space on your hard drive or USB drive.
- Zipped files are easier and quicker to share, as they take up less space
- You can zip multiple files into a single compressed folder. This makes it easier to share a group of files.
- Zipped files/folders can also be password protected and encrypted to protect data.
Zip Files in Windows 10
Now that we know about the advantages of zipping files, let us explore a few methods of zipping files and folders in Windows 10.
Zipping Single Files and Folders
Select the File or Folder that you want to compress.
Right-click on the File
On the drop down menu locate Send to and click on it.
On the side menu select Compressed (zipped) folder (see image below)
Hit Enter to accept the suggested filename, or you can change the file name to whatever you want to.
Zipping Consecutive Multiple Files
Follow these steps in case you are trying to zip multiple consecutive files in a folder, all of which need to be zipped.
A faster way to select all consecutive files in a folder is to click on the first file, hold down the Shift key and then click on the last file. You can try this or select files one by one by holding the Ctrl Key (if this suits you better).
After selecting all the files, Right-click
Click on Send to on the drop-down menu
Next click on Compressed (zipped) folder (see image below)
Hit Enter to accept the suggested filename or change the file name.
Zipping Non Consecutive Multiple Files
Follow these steps when you want only the selected files from a group of files in a folder or desktop to be zipped.
- Since the files are non-consecutive, hold down the Ctrl key and click on individual files that you want to select for compressing
- After selecting all the files, Right-click while still holding down the Ctrl key
- Navigate to Send to and select Compressed (zipped) folder.
- Hit Enter to accept the suggested filename or change the file name.
Zipping Files From Windows 10 File Explorer
Window 10 File Explorer offers a dedicated Zip tab in its ribbon menu. This is convenient for those files which are not located on your desktop. You can search for the files using file explorer and compress them right from the Files Explorer’s Zip Menu.
- Click on Windows 10 Start button (located at bottom left of your screen)
- Click on File Explorer
- Locate the Files or Folders that you want to compress.
- Navigate to the Share tab in File Explorer.
- Click the Zip tab. (see image below)
Zip Files By Adding them to a Zipped Folder
- Create a new folder (call it zipped folder or anything that suits you)
- Right click on the Folder
- Compress the folder by clicking on Send to and choosing Compressed (zip) Folder on the side menu Now you can ZIP any file by simply selecting the file that you want to zip and dragging it to the new zipped folder that you have just created.
Unzipping Files in Windows 10
Unzipping files in Windows 10 is just as easy as zipping them.
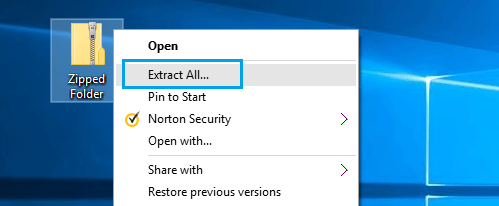
To extract everything in a compressed folder, just right-click on the Compressed Folder and then click Extract all.
Choose the location for the extracted files
To extract individual files or folders, open the compressed folder and then drag the files or folders you want to extract to a new location.