Well, all the answers to these questions will be provided to you in this article itself.
How to Schedule Emails in Gmail?
Previously, various email scheduler extensions were the only way to send emails according to a programmed date and time. But now, it’s no more the case. No more do we have to rely on other free email scheduling services to have our emails scheduled. The best free email provider, aka Gmail, has launched its own email scheduler function. Using this Gmail scheduler feature, you have the full control on when your email gets delivered to someone else. You get to decide the day, date, and time. You can even cancel the emails scheduled to be delivered. This feature is a godsend for people who work across different time zones or for the ones who don’t want to interrupt anyone’s vacation.
How to Schedule Emails in Gmail in the Browser?
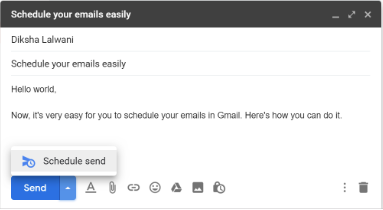
Step 1: Open Gmail in your browser, preferably Chrome. Step 2: On the left-hand side, click on Compose. Step 3: Start composing your email. Step 4: After finishing writing the email, you can begin scheduling it. Step 5: Go to the Send button and find the drop-down arrow near it. Click on it. Step 6: You’ll get the option of Schedule send. Click on that. Step 7: A menu box will appear asking you to choose the day, date, and time you would like the email to be sent on. You could either go with the default options, or you can customize your own date and time. Step 8: After selecting the day and time of your choice, click on Schedule send. You’ll see a message box in the bottom corner stating, “Send scheduled for…”. You can decide if you want to Undo or if you want to view the message.
How to Cancel Scheduled Emails in Gmail: In The Browser?
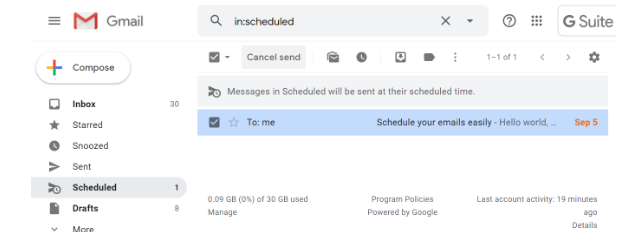
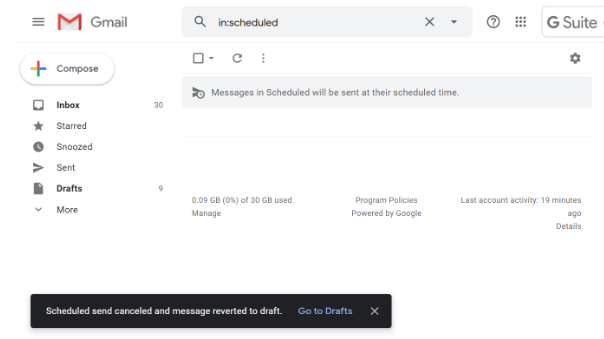
There are two ways you can cancel a scheduled email. Either you could click on ‘Undo,’ present in the message box which appears a second after you click on Schedule send. Or else you can follow these steps: Step 1: On the left-hand side, you’ll see an option named Scheduled. Click on it. Step 3: Above the mail, you’ll find Cancel Send. Click on that. Step 4: After doing that, you’ll see a message box on the bottom left corner stating “Scheduled send canceled and message reverted to draft.” Note: All the canceled scheduled emails are sent to Drafts in Gmail.
How to Schedule Emails in Gmail on the Phone?
With the email scheduler feature in the Gmail app, you can easily schedule emails in Gmail. Step 1: On your Android/iOS phone or tablet, open the Gmail App. Step 2: On the bottom right, tap Compose. And start composing an email. Step 3: After creating your email, tap More on the top-right. Step 4: You’ll find the option ‘Schedule Send’ at the top. Tap on it. Step 5: There will be various options regarding the date and time. Take your pick amongst them. Or you can even customize it. Step 6: After that, your mail will be scheduled to send. Note: You can have up to 100 scheduled emails.
How to Cancel Scheduled Emails in Gmail: On The Phone?
Step 1: Open the Gmail app. Step 2: Tap on Menu and then on Step 3: Click on Scheduled. Step 4: Now, open the email that you want to cancel. Step 5: Finally, tap on Cancel send. Note: When you cancel a scheduled email, it becomes a draft.
Final words:
And this is how you can schedule your emails in Gmail using the email scheduler feature. Now, you can send out all the mails at an appropriate date or time without worrying about any other factors. No need to pay any attention to the third-party email scheduler extensions anymore.