Unmountable Boot Volume Error in Windows 10
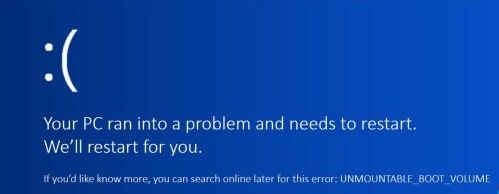
Unmountable Boot Volume Error can occur due to an error in operating system, corrupted system files, damaged RAM and also due to Hard Drive damage, specially in case of older computers. When this error occurs, you will see a Blue Screen with “Your PC ran into a problem and needs to restart.” error message.
In many cases, Windows operating system manages to fix the problem by itself and you will find the computer working normally after restart. If Windows is unable to fix the problem, you won’t be able to by-pass the Blue Screen of Death, even if you restart the computer multiple times. The only way to gain access to your computer in this case is to restart your computer using a bootable USB Drive. If you do not have a Bootable USB drive, you can create one right now by going to another computer and following the steps mentioned in this guide: How to Create Bootable USB Drive.
1. Restart Computer and Wait for 4 Hours!
Believe it or not, we personally witnessed a 7-year-old computer recovering from Unmountable Boot Volume Error, when it was restarted and allowed to stay on for about 4 hours. You can try these steps if you have the patience to wait for 3 to 4 hours or move to other methods to fix this problem.
- Use the Power button to shut down computer and allow it to cool down (15 to 30 minutes).
- Press the Power button to restart the computer and wait as the computer tries to fix the problem and ends up with a black screen.
- Leave the Computer on Black screen for about 3 to 4 hours. Hopefully, you will be surprised to see your computer back to normal. If not, you can move to other methods as provided below.
2. Use Automatic Repair
Perhaps the easiest way to fix Unmountable Boot Volume Error is to restart your computer using a Bootable USB Drive and try the Automatic Repair option that becomes available upon restart. Note: You may have to Enable USB Drive Boot option on your computer, if you are unable to access the computer using Bootable USB Drive.
- Use the Power button to Power OFF the computer.
- Insert Bootable USB Drive into the Computer and press Power button to restart your computer.
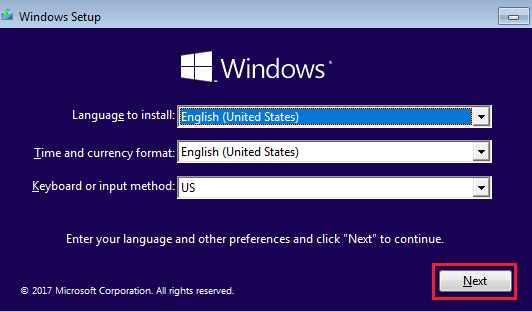
- On Windows Setup screen, select Language, Currency, Keyboard and click on the Next button.
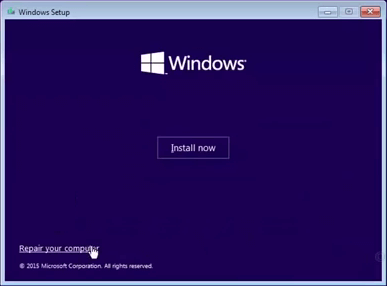
4. On the next screen, click on Repair your computer option located at the lower-left corner.
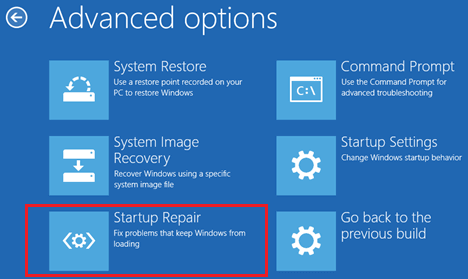
- Next, navigate to Troubleshoot > Advanced options > Startup Repair (or Automatic Repair).
6. Click on Next > Windows 10 or the operating system that is currently installed on your Computer. 5. Follow the onscreen instructions to complete the Startup Repair process. Note: It can take a long time for the repair process to be completed. Make sure that you allow the Startup Repair tool to takes its own time and do not try to end or abort the process.
3. Use Chkdsk
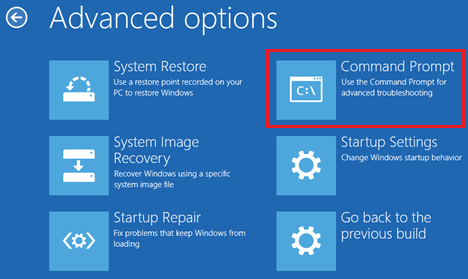
Unmountable Boot Volume Error can be caused due to hard disk errors. Hence, follow the steps below to check and repair hard disk errors on your computer. First, use the Power button to power OFF computer. Insert Bootable USB Drive into the Computer and press the Power button to restart Computer. After the computer restarts, click on Next > select Repair your computer option and navigate to Troubleshoot > Advanced options > Command prompt.
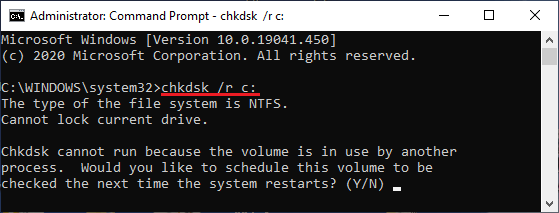
On the Command Prompt window, type chkdsk /r c: and press the Enter key on the keyboard of your computer.
Chkdsk may ask you to run next time the system restarts. If this happens, type Y and restart your computer. Patiently wait for the Chkdsk Command to find and fix Hard Disk Errors on your computer. Once, the Chkdsk command is complete, restart your computer and see if the problem is fixed.
4. Repair Master Boot Record
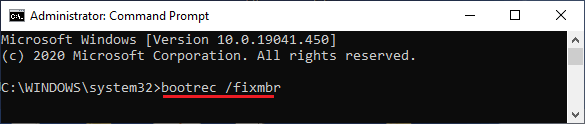
The Master Boot Record (MBR) helps the computer to locate Windows operating system and properly load the operating system. Power OFF the computer using Power button. Insert the Bootable USB Drive into Computer and use the Power button to Restart Computer. After the computer restarts, click on Next > select Repair your computer option and navigate to Troubleshoot > Advanced options > Command prompt. On the Command prompt screen, type bootrec /fixmbr and press the Enter key.
Wait for the command to complete and also run bootrec /fixboot and bootrec /rebuildbcd commands to fix this issue. After running above commands, type Exit and press the enter key to close the command prompt screen and restart your computer.
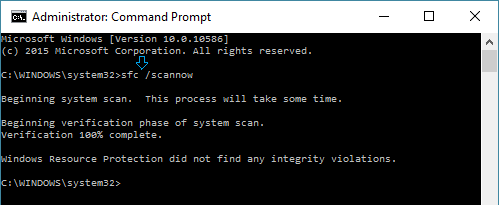
5. Use SFC Scan
SFC or System File Checker is another built-in Windows utility that you should try to fix this problem. Use the Bootable USB drive to boot your computer and navigate to Command Prompt screen, using steps as provided in above methods. On the Command Prompt screen, type sfc /scannow and press the enter key on the keyboard of your computer.
Patiently wait as Windows 10 tries to scan and fix system file problems on your computer.
6. Reinstall Windows 10
If none of the above methods work, you can try to Reinstall Windows 10 on your computer. The disadvantage of this method is that you will end up losing all the data and files on your computer. Shut Down the computer and restart using Bootable USB Drive. Once the computer starts, click on Next and select Install Now option.
Follow the onscreen instructions on Reinstall Windows 10 on your computer.
How to Fix 100% Disk Usage in Windows 10 How to Fix Corrupt User Profile In Windows 10