Unable to Join Network Error on iPhone and iPad
As you will agree, an error message reading “Unable to Join Network” does not help, as it does not really indicate as to what might be wrong with your device or the network. However, this error message is quite common and users have reported fixing “Unable to Join network” error on iPhone using the following troubleshooting steps.
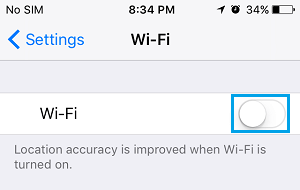
1. Reconnect to WiFi Network
Many times, WiFi connectivity issues on iPhone can be fixed by the simple act of turning OFF WiFi and turning it back on again. Go to Settings > Wi-Fi > switch OFF Wi-Fi by moving the toggle to OFF Position.
After 30 seconds > switch ON Wi-Fi by moving the toggle to ON position.
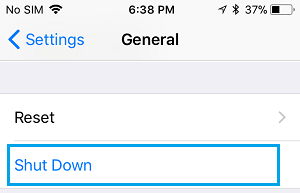
2. Restart iPhone
The simple act of Shutting Down iPhone and Restarting it back again might surprise you by fixing the problem on your iPhone. Go to Settings > General > scroll down and tap on Shut Down.
Allow iPhone to completely Power OFF > Wait for 30 seconds and Restart iPhone.
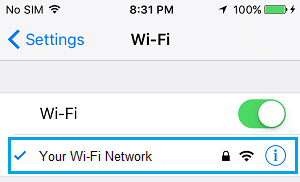
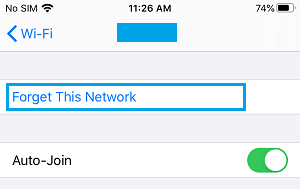
3. Forget WiFi Network and Rejoin
Note down the Password for your WiFi Network and follow the steps below to forget and rejoin the WiFi Network. Go to Settings > Wi-Fi > tap on your Wi-Fi network.
On the next screen, tap on Forget This Network option.
On the confirmation pop-up, tap on Forget to confirm. After 30 seconds, connect back to your Wi-Fi Network.
5. Use a Computer to Join WiFi Network
Use your Laptop or Desktop Computer to connect to your home WiFi Network. Once you are able to connect to internet on your computer, try accessing the internet on your iPhone or iPad. Magically, your iPhone or iPad should immediately connect to WiFi network and you will no longer see “Cannot Connect to network” error message on your iPhone.
6. Power Cycle Modem/Router
Disconnect Modem/Router from Power Supply > wait for 60 seconds and reconnect Modem/Router to Power Supply again. This will cause the WiFi Network to Reset and may assign a New IP Address to your Router/Modem, which should help in fixing “Unable to Join WiFi Network” error on your iPhone.
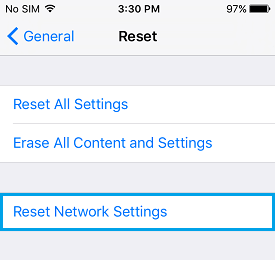
7. Reset Network Settings
Note down the Password for your WiFi Network and follow the steps below to Reset Network Settings on your iPhone to Factory Default Settings. Go to Settings > General > Transfer or Reset iPhone > Reset > On the pop-up, select Reset Network Settings option.
On the confirmation pop-up, tap on Reset Network Settings again confirm. After this, you should be able to connect to your WiFi Network without coming across “Unable to Join Network” error message.
10 Ways to Fix iPhone Not Connecting to WiFi Issue How to Clear Your Browsing History On iPhone