Skype Not Opening or Responding in Windows 10
Sometimes, the Skype App does not open at all or abruptly stops responding while making an Audio or Video Call. While this problem is more common following an update, it can also occur at any other time due to network problems and other reasons. Before going ahead with troubleshooting steps as provided below, make sure that your internet connection is working.
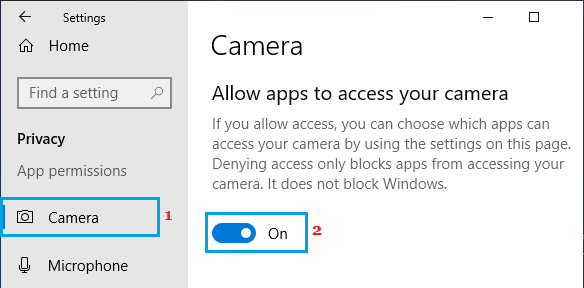
1. Allow Apps to Access Microphone & Camera
First make sure that Apps on your computer are allowed to access Microphone and Camera.
Go to Settings > Privacy > select Camera in the left-pane and enable Allow Apps to access your Camera option.
Next, select Microphone in the left-pane and enable Allow Apps to access Camera hardware option.
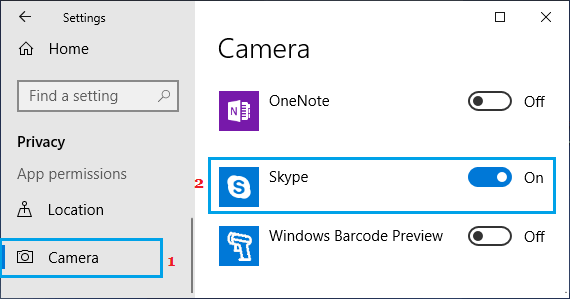
2. Allow Skype to Access Webcam & Microphone
Next, make sure that Skype has the permission to access both Camera and Microphone on your computer.
Go to Settings > Privacy > select Camera in the left-pane. In the right-pane, scroll down to “Choose which apps can access your camera” section and toggle ON the slider next to Camera.
On the same screen, scroll down further and move the slider next to Skype to ON position.
Next, select Microphone in the left-pane. In the right-pane, scroll down to “Allow Apps to Access your Microphone” section and move the toggle next to Skype to ON position. Restart your computer and see if Skype is now working.
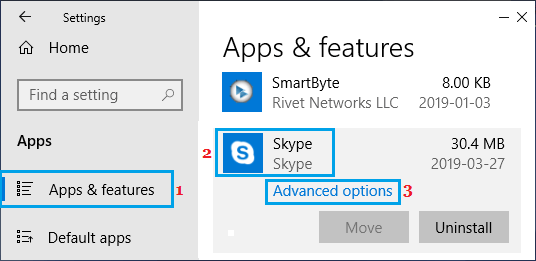
3. Repair Skype App
Sometimes, the Skype App can become corrupted and this can be fixed by using the Repair App option as available in Windows 10.
Go to Settings > Apps > click on Apps & Features in the left pane. In the right-pane, scroll down and click on Skype > Advanced options.
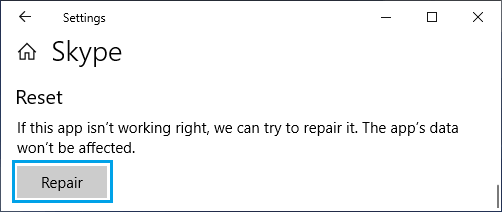
On the next screen, scroll down and click on the Repair button.
Restart your computer and see if Skype is now working on your computer.
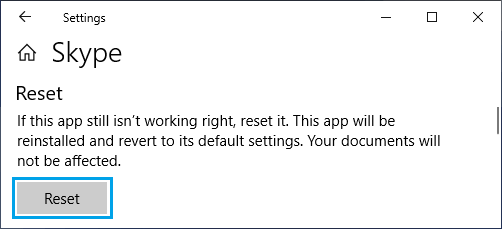
4. Reset Skype
If the repair option did not work, you can Reset Skype App. This will basically remove and reinstall the Skype on your computer.
Go to Settings > Apps > click on Apps & Features in the left pane. In the right-pane, scroll down and click on Skype > Advanced options.
On the next screen, click on the Reset button.
On the confirmation pop-up, click on Reset to confirm. Restart your computer and see if Skype is now working on your computer.
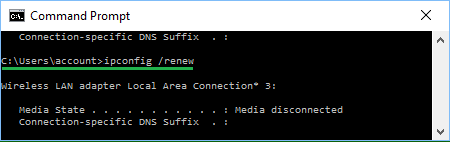
5. Reset Network Configuration
Sometimes Network related problems can prevent Skype from working properly. Hence, run the following Commands to fix network related problems on your computer.
- Open Command Prompt > type ipconfig /release and press the enter key.
This will release the current IP Address of your computer. 2. Next, type ipconfig /renew and press the Enter key to Renew the IP Address of your computer.
Similarly, run netsh winsock reset, netsh int ip reset, ipconfig /flushdns and ipconfig /registerdns commands. 3. Close the Command Prompt window and Restart your computer. After the computer restarts, open Skype and see if it is now working properly on your computer.
6. Check Firewall Blocking
It is possible that Windows Defender Firewall or Firewall of the Antivirus software program installed on your computer might be blocking Skype. You can unblock Skype in Windows Defender Firewall using steps provided in this guide: How to Allow Apps Through Firewall in Windows 10/11. If you are using Norton or any other Antivirus program, you will have to go into Firewall Settings of the Antivirus Program to unblock Skype.
How to Hide Background During Skype Video Calls How to Stop Skype From Running in Background in Windows 10