Epson L5190 is an all-in-one printer that can copy, print, and scan. This multifunction printer is an excellent choice for office purposes. And, you need a correct driver file in order to use all its features appropriately. Usually, it comes with pre-installed drivers but if the installed driver life goes missing or out of date, then your printer may become unresponsive. Therefore, it is crucial to update the corresponding drivers from time to time. To help you in this, we have prepared this driver installation guide highlighting a few methods that come in handy. Although manual methods to update the Epson L5190 driver are also there, these methods are quite tough to follow and time-consuming. Hence, you need to update the printer driver using the automatic tool named Bit Driver Updater. With the help of this tool, you can also manage the existing drivers on your PC in multiple ways. You will find loads of other features of the tool in the explanation later. However, firstly download the updater using the button below and proceed.
Methods to Download, Install and Update Epson L5190 Driver on Windows PC
There are mainly three ways that you can consider for performing Epson L5190 driver download on PC. However, you do not need to give all of them a try, just work your way down until you find the best way for you.
Method 1: Get Latest Epson L5190 Printer Driver from Epson’s Official Website
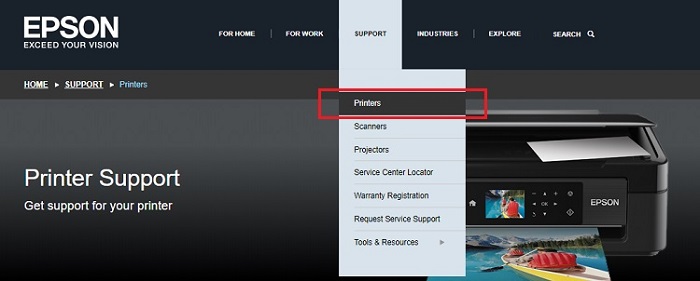
If you have years of experience in the technical niche, and sufficient time, then you can get the respective drivers from the official website of Epson. Here is how: Step 1: Visit the official webpage of Epson. Step 2: Hover your mouse over the Support tab and then choose Printers from the drop-down menu list.
Step 3: On the next page, type the model name of your printer for which you are looking for the latest version of drivers. In this case, enter Epson L5190 and click on the Search button. Step 4: Next, choose the compatible operating system. Step 5: Lastly, click on the Download button to get the driver installer. Once downloaded, run the installer and comply with the simple instructions appearing on your screen. After the successful installation of the Epson L5190 printer drivers, reboot your computer to apply the changes. Also Read: Epson ES-400 Scanner Driver Download, Install & Update for Windows PC
Method 2: Update Epson L5190 Printer Driver in Device Manager
Another way to install the latest version of drivers for the Epson L5190 multifunction printer is Device Manager. It is a default tool in the Windows operating system that manages the hardware and related drivers. To use this tool, follow the steps indicated below: Step 1: On your keyboard, altogether hit the Windows + X keyboard keys and choose Device Manager from the available options.
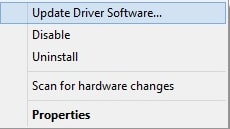
Step 2: In the Device Manager window, navigate to the Printer or Print Queues category and double click on it. Step 3: Right-click on the Epson L5190 and choose Update Driver Software…
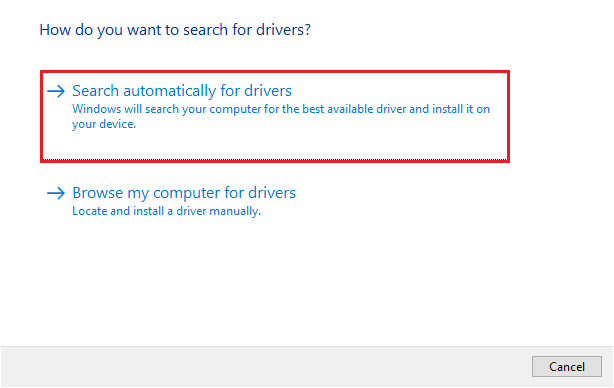
Step 4: Select Search Automatically for Updated Driver Software from the next prompt.
Now, wait until the Device Manager finds and installs the required drivers’ updates for your system. Once installed, restart your system. Also Read: Epson L360 Free Printer Driver Download and Install for Windows PC
Method 3: Use Bit Driver Updater to Automatically Install Epson L5190 Driver (Recommended)
Don’t have enough time or skills to install drivers manually? No worries, you can still do it automatically with Bit Driver Updater. This driver updater is well-known for its efficiency and smooth working. Bit Driver Updater is a professionally designed software that takes only a single or two clicks of the mouse to perform a driver update. Apart from that, it also boosts the performance of an entire system by clearing the junk files across the corners of the PC. The utility also allows you to schedule driver scans as per your comfort. Now, here are the simple steps that you need to take into consideration to use Bit Driver Updater: Step 1: From the download button below, get the setup file of Bit Driver Updater for Free.
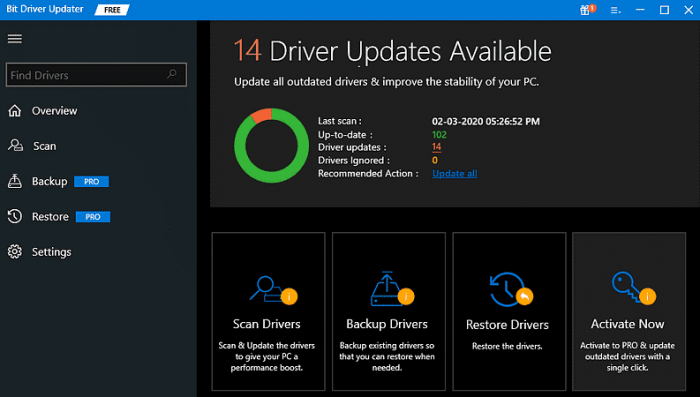
Step 2: Run the setup file and complete the installation by following the on-screen instructions. Step 3: Once installed, open the driver updater on your PC and click on Scan.
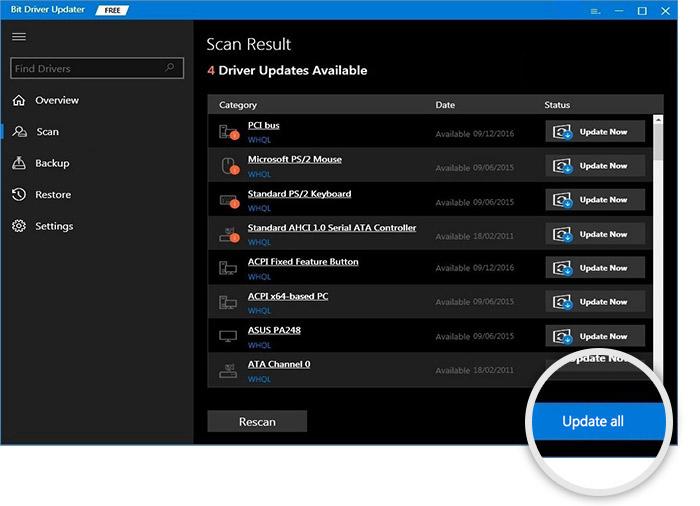
Step 4: Wait for the scanning to be performed successfully. Step 5: Then, review the scan results and locate the Epson L5190 driver, later click on the Update Now button presented next to it. If you are using a pro version, then you can also click on the Update All button. This will perform the bulk driver downloads at once which saves manual time and effort.
Unlike others, Bit Driver Updater’s pro version provides 24*7 technical help and a complete money-back guarantee but only within 60 days of purchase. Also Read: How to Fix Epson Printer not Printing on Windows 10, 8, 7
Download and Update Epson L5190 Printer Driver on Windows: Done
We hope you liked the above-shared information. If we missed out on anything then please let us know in the comments box below. Also, drop your queries or further doubts in the comments. We will try to help you in the best way possible. Furthermore, before you leave, do subscribe to our Newsletter for more tech-related articles or other similar stuff. Finally, you can also follow us on Facebook, Twitter, Instagram, and Pinterest.