Delete Previous Windows Installations (Windows.old)
When you upgrade from an older version of Windows (7/8) to Windows 10, your computer creates Windows.old folder and keeps the previous Windows installation files saved in this folder. Windows.old folder is also created when you perform a clean installation of Windows 10 without formatting the drive containing Previous Windows installation. This precautionary measure in Windows OS is designed to allow users to switch back to the previous version of Windows, if the latest version is not working properly. However, if the latest version of Windows is working fine, there is no need to allow the Previous Windows Installation to take up so much storage space on your computer, especially if you have less space in C: Drive. Note: If you remove previous Windows installation files, you won’t be able to downgrade to previous version of Windows (which hopefully won’t be required).
1. Delete Previous Windows Installations Using Storage Sense
If the “Storage Sense” feature is enabled on your computer, the Previous Windows Installations will be automatically removed from your computer after 10 days. If you do not like enabling Storage Sense, you can follow the steps below to remove Previous Installations of Windows operating system from your computer.
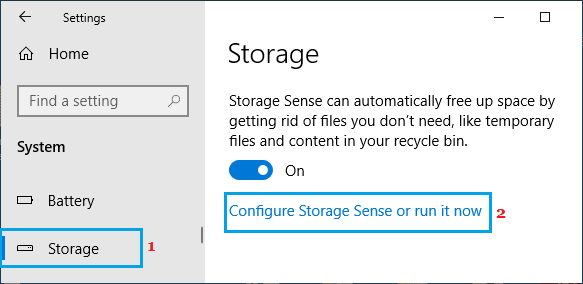
Open Settings > click on the System tab.
On System Settings screen, click on Storage in the left-pane. In the right-pane. click on Configure Storage Sense or run it now.
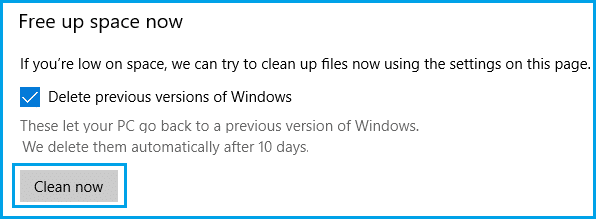
On the next screen, scroll down the list and select Delete previous versions of Windows option and click on Clean now button.
Wait for Storage Sense to remove all the files related to the previous Windows installation from your computer.
2. Delete Previous Windows Installations Using Disk Cleanup
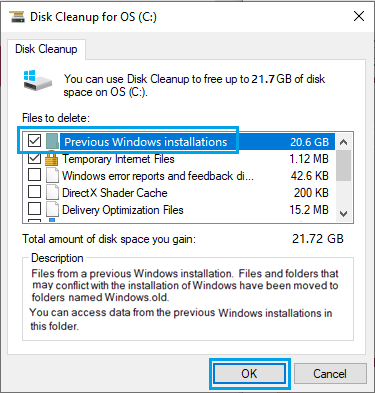
Click on the Start button > type Disk Cleanup in the Search bar > right-click on Disk Cleanup App and click on Run as Administrator.
When prompted, enter your Admin Password and wait for Windows to calculate the amount of storage space that can be saved on your computer.
On the next screen, select Previous Windows Installations and click on OK.
3. Delete Previous Windows Installations Using Command Prompt
You can also delete the Previous Windows Installation files using Command Prompt.
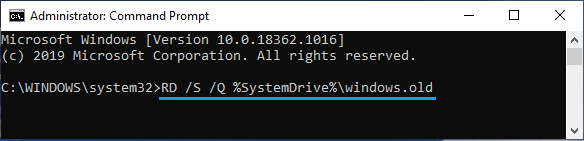
Right-click on Start and click on Command Prompt (Admin).
On Command Prompt window, type RD /S /Q %SystemDrive%\windows.old and press the Enter key on the Keyboard of your computer.
Wait, until the command is completed and you get to the next prompt. Note: It usually takes a few minutes to complete this command. Do not close the Command prompt window until you get to the next prompt.
How to Free Up Hard Disk Storage Space in Windows 10 How to Uninstall Apps and Programs In Windows 10